In my opinion, the quickest way to monitor the ambience (e.g. weather station) is to deploy a sensor node and have the data streamed to a cloud platform that provides a nice dashboard.
Sure, we can use platform like ThingSpeak that provides fuss-free all-in-one solution. However, I always prefer to use a generic cloud platform which allows more flexibility. It only takes half an hour to set this up.
In today’s post, we’ll read temperature and humidity data from DHT11 and have it stream to AWS IoT via MQTT protocol. We’ll setup the Amazon ElasticSearch Service and configure a rule so that we can visualize the data on Kibana plugin.
 Pre-requistes:
- AWS account
- Raspberry Pi (preferably RPi3) with Raspbian OS (tested on Jessie)
- DHT11
Testing AWS IoT MQTT broker
AWS IoT console provides a simple MQTT client for testing purpose. This can accessed under “Test” tab.


Creating certificate for device connectivity
AWS IoT only supports authenticated and secure connection. For the usage of certificate, AWS provides 3 options: bring-your-own, create with your CSR or one-click (with AWS IoT Cert Authority). For simplicity sake, we’ll use the one-click option for our device to communicate with AWS.
In the AWS IoT console, go to Security > Certificates > Create > Create Certificate (1st Option)
Save all 4 files into your device (i.e. Raspberry Pi). Don’t forget to download the root CA from Symantec (click here if you missed it).

Now, we need to create a policy and assign it to the certificate. Without a policy, your device is not authorised to perform any action (e.g. connect, publish).
Go to Security > Policies > Create > Create a policy
We’ll create a policy that allows all AWS IoT related actions to be performed. In a production environment, it should be done differently, by following security best practices – authorising only necessary actions.

Next, attach the policy to the certificate we created earlier. Go to Security > Certificates. Click on the “3 dots” on the certificate to bring out the option. Click “Attach a policy” and select the policy we created earlier. Activate the certificate if it is not already “Active”.
Setting up the Raspberry Pi and DHT11
Ensure that your device has internet connection.
Connect the DHT11 to the Raspberry Pi.

Install AWS IoT Python SDK
 > git clone https://github.com/aws/aws-iot-device-sdk-python
 > cd aws-iot-device-sdk-python
 > sudo python setup.py install
The following successful message should be seen, otherwise run the last step again.
Running install
…
Running install_egg_info
Removing…
Writing /usr/local/…
Download DHT11 Python library and create our script that will read data from the sensor and publish to AWS IoT.
> git clone https://github.com/szazo/DHT11_Python
> cd DHT11_Python
> vi read_and_publish.py
Content of read_and_publish.py is as below. Change line 14 and 15 to reflect your broker address and path of the certificate. The broker address can be found in the AWS IoT console under Settings tab.
import RPi.GPIO as GPIO
import dht11
from AWSIoTPythonSDK.MQTTLib import AWSIoTMQTTClient
from time import sleep
from datetime import date, datetime

# initialize GPIO
GPIO.setwarnings(False)
GPIO.setmode(GPIO.BCM)
GPIO.cleanup()

# AWS IoT certificate based connection
myMQTTClient = AWSIoTMQTTClient("123afhlss456")
myMQTTClient.configureEndpoint("A3XXX.iot.eu-west-1.amazonaws.com", 8883)
myMQTTClient.configureCredentials("/home/pi/cert/CA.pem", "/home/pi/cert/xxxx-private.pem.key", "/home/pi/cert/xxxxx-certificate.pem.crt")
myMQTTClient.configureOfflinePublishQueueing(-1)  # Infinite offline Publish queueing
myMQTTClient.configureDrainingFrequency(2)  # Draining: 2 Hz
myMQTTClient.configureConnectDisconnectTimeout(10)  # 10 sec
myMQTTClient.configureMQTTOperationTimeout(5)  # 5 sec

#connect and publish
myMQTTClient.connect()
myMQTTClient.publish("thing01/info", "connected", 0)

#loop and publish sensor reading
while 1:
	now = datetime.utcnow()
	now_str = now.strftime('%Y-%m-%dT%H:%M:%SZ') #e.g. 2016-04-18T06:12:25.877Z
	instance = dht11.DHT11(pin = 4) #BCM GPIO04
	result = instance.read()
	if result.is_valid():
		payload = '{ "timestamp": "' + now_str + '","temperature": ' + str(result.temperature) + ',"humidity": '+ str(result.humidity) + ' }'
		print payload
		myMQTTClient.publish("thing01/data", payload, 0)
		sleep(4)
	else:
	    print (".")
	    sleep(1)
Start the script. We’ll be able to see messages being published to the broker.
> python read_and_publish.py
{ "timestamp": "2017-01-28T05:38:14Z","temperature": 27, "humidity": 55 }
{ "timestamp": "2017-01-28T05:38:19Z","temperature": 28, "humidity": 53 }
{ "timestamp": "2017-01-28T05:38:24Z","temperature": 28, "humidity": 53 }

Setup AWS ElasticSearch Service and Kibana Dashboard
ElasticSearch is a full-text search engine. In our case, we’ll use it as a database to store telemetric data. We’ll use the Kibana plugin to visualise the data.
Go to the Amazon ElasticSearch Service console. Create a new domain/cluster. Give your cluster a name. Leave everything else as default or you may change it to fit your need.
Then click next till “Step 3: Set up access policy”. I recommend restricting access to your cluster based on IP address. Pick the template and enter the IP address. Confirm and create.
Few minutes later, our ElasticSearch cluster endpoint and Kibana endpoint information is visible.

Now, we’ll need to setup a rule so that all incoming messages into AWS IoT will be published to the ElasticSearch cluster.
Go to Rules > Create a Rule. Give the rule a relevant name, e.g. publish_to_elasticsearch
Set the attribute, topic filter and condition so that the SQL query will be “SELECT * FROM ‘thing01/data'”.
Then, add the action “Send messages to the Amazon Elasticsearch Service”.
Domain name: Choose the domain that we created above
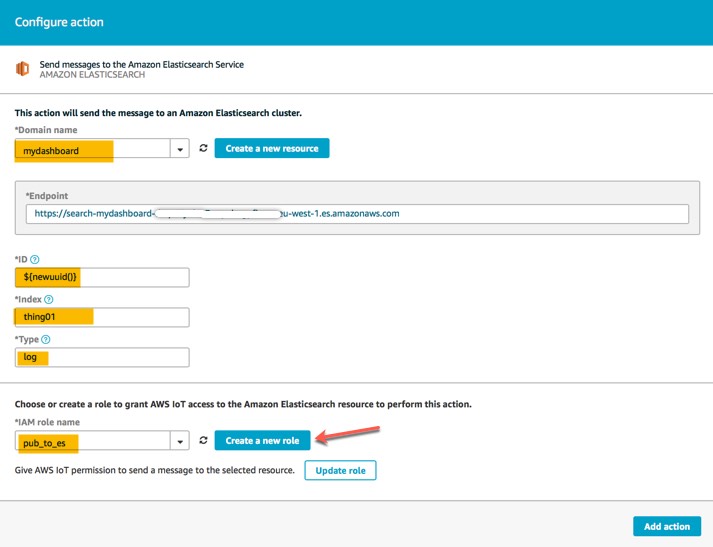
Endpoint: No action required, automatically selected
ID: ${newuuid()}
Index: thing01
Type: log
Role name: Click “create a new role” so that AWS automatically creates it
Ensure that the rule is “enabled”.
Load the Kibana dashboard. Select the index that we have configured just now.

On the “Discover” tab, we can see the entries in the ElasticSearch Cluster. Now, let’s create a dashboard to display temperature and humidity data over time.
Go to Visualise > Line Chart > From a new search

Click the play button. We can save this visualisation for next time.

myMQTTClient = AWSIoTMQTTClient(“123afhlss456”)
is this common or we need to do any change?
python read_and_publish.py
Traceback (most recent call last):
File “read_and_publish.py”, line 22, in
myMQTTClient.connect()
File “/usr/local/lib/python2.7/dist-packages/AWSIoTPythonSDK/MQTTLib.py”, line 405, in connect
return self._mqttCore.connect(keepAliveIntervalSecond)
File “/usr/local/lib/python2.7/dist-packages/AWSIoTPythonSDK/core/protocol/mqttCore.py”, line 287, in connect
self._pahoClient.tls_set(self._cafile, self._cert, self._key, ssl.CERT_REQUIRED, ssl.PROTOCOL_SSLv23) # Throw exception…
File “/usr/local/lib/python2.7/dist-packages/AWSIoTPythonSDK/core/protocol/paho/client.py”, line 607, in tls_set
raise IOError(certfile+”: “+err.strerror)
IOError: /home/pi/devicesdk/xxxxx-certificate.pem.crt: No such file or directory
As i am running script i am getting above error.
Hello Hekami,
You can leave the line myMQTTClient = AWSIoTMQTTClient(“123afhlss456”) as it is. This is just an ID so that the MQTT broker can identify the client, using any random string will do.
You’re getting the error “IOError: /home/pi/devicesdk/xxxxx-certificate.pem.crt: No such file or directory” Seems like the script is not picking up your certificate file. Have you check that the certificate exist and is valid?
Regards, Calvin
I have downloaded the certificates from aws console and untouched, however i get the error as above.Kindly help me on this.
You need to change 2 lines. The first line is “configureEndpoint” where you have to specify your AWS IoT broker address. The 2nd line is “configureCredentials”, you need to specify the location of the 3 items that you have downloaded from AWS console – CA, private key and certificate).
Calvin, first of all, great tutorial! I got everything working except I’m stuck on the Kibana part. I’m new to AWS IoT and I don’t know how to navigate to the dashboard view that you show above for Kibana. Can you give me pointers when you refer to “Load Kibana”?
Disregard. I figured it out. 🙂
Greetings! Glad you found it =)
Hi,
efren
you did all as it is explained in above tutorial.
i am also trying but i am not getting .It is giving error.
plz help me out in this.
my email id :-hekami.engineering@gmail.com
Hello Hekami, can you please describe the error that you are seeing? Have you got passed the “No such file or directory” issue?
Regards, Calvin
Hi calvin, about this, may i know which link did u download in the pi for kibana? downloaded linux but doesn’t work for me…
Hello Hui, we are using the AWS ElasticSearch Service which comes with Kibana plugin, you don’t have to install the software in the Pi.
Hi Calvin,
I have ElasticSearch setup and I am able to access the Kibana Dashboard. I am able to point to my “thing01” index that I created, but the “Time-Field” name remains blank. I click on “refresh fields”, but it still remains blank, so I am unable to create the Index Pattern. Am I missing a step?
I followed the previous step on creating the ElasticSearch Domain to the letter… but am stuck so I am unable to advance.
Hello, can you confirm that you can see data being published from your device to AWS IoT? Do also check that the timestamp format is valid… in order for ElasticSearch to recognise.
Sorry, looks like I missed out in the post above, in the IoT rule, the topic filter should be “thing01/data”, attribute can leave it as “*”. Hence the query should be “SELECT * FROM ‘thing01/data'”. Let me know if it works for you.
Calvin, the change to the topic filter worked! Thank you again for the great post. I have everything running now.
Hi Calvin. I am unable to configure an index pattern in Kibana. And my cluster status is yellow. Would you know what I might have missed? Thanks.
Hello Sam, elasticsearch cluster status yellow is expected since we only have single node/member configured (i.e. you can ignore it for this setup). If you can’t find the index pattern in Kibana, that means the data is not posted correctly from AWS IoT to elasticsearch. Do double check if you have the IoT rule configured correctly.
Hi Calvin and everybody.
How do you guys “Load the Kibana dashboard”. I am at that point and the only thing to do that that I see is in the inside my domain in ElasticSearch the Kibana link, which I clikec but only got a new page with message: “{“Message”:”User: anonymous is not authorized to perform: es:ESHttpGet on resource: ls05″}”
Any clue how should I proceed.
Thanks Calvin for this good walk through (is actually far better and simpler than the officially AWS documentation).
Esteban
Calvin, this issue was partially solved. It was the IP address permission which was creating that. I had to leave the domain fully open to be able top access Kibana. Also when authorising only the AWS account with the ID, generated the same problem.
Now the issue is that when creating the index pattern there is no option to select a “Time Filter field name”. And I have no clue where is the issue, as the time format is the same as in the original script, the topic was also properly created in the IoT rule and the “thing”/device is also publishing data to IoT AWS.
Hi Calvin,
me again. Progressing slowly with this, as at every step kibana seems to be missing something. Just one question. Are you sure there is not a step missing in your post for get Kibana running? Something like mapping, timestamp formatting, or something related similar? I managed to add my index pattern but Kibana keeps saying (in the Discover tab) “No results found”. Also in the AWS ElasticSearch dashboard for my domain, my index doesn’t show any mappings and shows count “0”.
In other documentation I have seen that under the index (in the ElasticSearch AWS dashboard, should appear some mapping fields.
I wonder if you could break down a bit more the step.
I appreciate any help.
Esteban L
Hi Esteban,
I face the same issue as you when i click the Kibana link in my ElasticSearch domain, could you please help me to solve the problem. Thank you
Hello, to make things simple, in the ElasticSearch console, make sure public access has been chosen when creating the domain. Also, select template “allow open access to the domain”.
Hello Esteban, I’ve just reviewed the post and I don’t think anything’s missing. If you follow the timestamp I used then it should not be an issue, unless new version of elastic search doesn’t recognise that but I really doubt so. And you don’t need to define the mapping as the default assignment should work (or you can simply try using another index).
I’ll help you here. Do check the following:
1. Data is being posted to AWS IoT and that you can see in the AWS console’s MQTT broker
2. Ensure the rule is enabled. And that the rule (e.g. query, id, type) is configured correctly.
3. Go to the AWS IAM console, go to Role and select the role you created for the rule. Click the access advisor and see when’s the last accessed date (this will tell when’s the last time the rule attempted to access elasticsearch).
Report your findings and let me know if you still have issue. Regards, Calvin
Hi, Calvin,
Thanks for your tutorial.
I face problems at the same situation
Firstly,i cant go through step configure an index pattern. I cant find this step. pls help.
Thank You,
Regards,
Choon
Dear Choon, can you please describe which part you’re stuck and what you see? Configuring index pattern should be done in the management tab, make sure you selected option “index contains time based events”. If you have trouble with this, please check the AWS ElasticSearch Service console and see whether the index exist?
Greetings, perhaps i leave my email here. can u message me so that i can attach picture describing my problems. Thanks
zack_061994@hotmail.com
Rgds,
Choon
Hi Calivn i am not getting values for thing01 index name or pattern , if i define pattern name as thing01 i am getting as unable to fetch mapping. so how i need to define it? Can u please help me to solve this issue.
Hello, this means data is not published from AWS IoT to the ElasticSearch correctly (since the index is not found in Kibana console, means no data for that index). Can you confirm that the rule is indeed correct and you have the necessary IAM role attached to the IoT rule?
Hi Calvin,
I have issue this is :
” We cannot display the message as JSON, and are instead displaying it as UTF-8 String “.
I don’t know why it happen ?
I have been configured instructions.
Please, Can you help me ?
Tks
Hello, did you get this error message when running the python script? Could you please describe a little more (where you see this?) as I’ve never seen it before.
Hi Calvin,
I have run read_and_publish.py after changing the broker address and the path of the certificate. However, i face this error: ImportError: No module named ‘AWSIoTPythonSDK’ . Pls help . Thank you .
Hello, the error message means the AWS IoT Python SDK is not found –> something went wrong when you’re doing the part “Install AWS IoT Python SDK”. Can you please try installing it again, BTW I’m on python 2.7 (din’t try on Python 3)
Hi Calvin,
I reinstalled the AWS IoT Python SDK but am still facing the same error. I am using python 3 though.
Hi Calvin,
When i am creating the rule for the Elasticsearch, at the “Configure action” page, after i input the information in the textbox, the Endpoint was not automatically selected. I am unable to click “Add Action”. Can you please help me to solve this. Thank you.
Hello Xinyi, did you manage to select the correct Domain (the ElasticSearch cluster you created earlier)? By the way, I haven’t tried the code with Python 3.
Hi Calvin,
How do i setup the Kibana?
Hello, I don’t quite understand your question. The instructions are already provided in the post. Kibana plugin is included when you create a domain in AWS ElasticSearch Service.
hi calvin,
till now i am facing the same problem of certificates.Even though i am following your steps clearly.
Please ghelp me out in this.
Traceback (most recent call last):
File “read_and_publish.py”, line 5, in
ssl.OPENSLL_VERSION
AttributeError: ‘module’ object has no attribute ‘OPENSLL_VERSION’
This error i am getting now.could you help me out.
Hello, in line 5 of my code, there’s nothing to do with SSL so it’s strange you get the error message. Can you please drop me an email contact at calvinboey.com with the screenshots of your configuration and errors?
Now i am running the read_and_publish.py script is not running.
I installed the AWS IoT Python SDK and again i came to /home/pi directory and installed DHT_11 .
Do i need to keep DHT_11 inside AWS IoT Python SDK.
python read_and_publish.py
^CTraceback (most recent call last):
File “read_and_publish.py”, line 21, in
myMQTTClient.connect()
File “/usr/local/lib/python2.7/dist-packages/AWSIoTPythonSDK/MQTTLib.py”, line 408, in connect
return self._mqtt_core.connect(keepAliveIntervalSecond)
File “/usr/local/lib/python2.7/dist-packages/AWSIoTPythonSDK/core/protocol/mqtt_core.py”, line 168, in connect
self.connect_async(keep_alive_sec, self._create_blocking_ack_callback(event))
File “/usr/local/lib/python2.7/dist-packages/AWSIoTPythonSDK/core/protocol/mqtt_core.py”, line 179, in connect_async
rc = self._internal_async_client.connect(keep_alive_sec, ack_callback)
File “/usr/local/lib/python2.7/dist-packages/AWSIoTPythonSDK/core/protocol/internal/clients.py”, line 113, in connect
rc = self._paho_client.connect(host, port, keep_alive_sec)
File “/usr/local/lib/python2.7/dist-packages/AWSIoTPythonSDK/core/protocol/paho/client.py”, line 654, in connect
return self.reconnect()
File “/usr/local/lib/python2.7/dist-packages/AWSIoTPythonSDK/core/protocol/paho/client.py”, line 776, in reconnect
sock = socket.create_connection((self._host, self._port), source_address=(self._bind_address, 0))
File “/usr/lib/python2.7/socket.py”, line 566, in create_connection
sock.connect(sa)
File “/usr/lib/python2.7/socket.py”, line 228, in meth
return getattr(self._sock,name)(*args)
KeyboardInterrupt
Hi Calvin! Thank you very much to share so many things to us. It is really helpful!
Can I know if I use Sense Hat instead of DHT11 as a sensor, what codes shall I change in the ‘read_and_publish.py’?
Like i need to amend “instance = dht11.DHT11(pin = 4) #BCM GPIO04 result = instance.read()” to sensehat something…..?
Please help me figure it out! And thank you very much!
Hello Berry,
Yes, you are right, you’d need to replace the DHT lines to use SenseHat library. Unfortunately I don’t have the hardware to test, I’m guessing the GPIO lines can be removed since the SenseHat library should know the GPIO ports.
Regards,
Calvin
I see I see~~ Anyway thank you for sharing and helping!
Hi calvin
am running python read_and_publish.py then found below error and also attach screen-shot
No handlers could be found for logger “AWSIoTPythonSDK.core.protocol.mqtt_core”
Traceback (most recent call last):
File “read_and_publish.py”, line 23, in
myMQTTClient.connect()
File “/usr/local/lib/python2.7/dist-packages/AWSIoTPythonSDK/MQTTLib.py”, line 481, in connect
return self._mqtt_core.connect(keepAliveIntervalSecond)
File “/usr/local/lib/python2.7/dist-packages/AWSIoTPythonSDK/core/protocol/mqtt_core.py”, line 186, in connect
raise connectTimeoutException()
AWSIoTPythonSDK.exception.AWSIoTExceptions.connectTimeoutException
Hello, everything works, but it gives false to a result.isValid() very often (9/10 times is false). Can that be fixed? Thanks
Helo Jess, I think its related to how the library works (i.e. handles the communication with the sensor). I’ve since use the Adafruit library (https://github.com/adafruit/Adafruit_Python_DHT) which seems to be more stable, minor change of code is required, see the example. Regards, Calvin
Thanks for the response, I have tryed that library, but I’m using old Raspberry PI version 1, and I’m getting an error, it detects wrong board version (somebody already wrote that in “Issues”).
I don’t have time to fix that, so I’ll use the library you are using. Thanks anyway, I’ve learned something trying to fix that error althought I didn’t fix it. 🙂
Hi calvin?
I am success MQTT Test, But aws – iot shadow data is not update
Is this related to shadow format?
{
“state”: {
“reported”: {
“timestamp”: “20171222212948”,
“temperature”: 24,
“humidity”: 26
}
}
}
it is my data from mqtt
How do I set the shadow format?
Hello Yuhwan, updating Thing Shadow is not covered in this post. In order to update, you’ll need to first assign a thing to the cert. Then, you need to post to the specific MQTT topic of the thing (i.e. $aws/things/thingName/shadow/update). Regards, Calvin
Thank you very much !! I success it
iam getting follwing error . ihave connected DHT22 will it be problem
root@raspberrypi:/home/pi/aws-iot-device-sdk-python/DHT11_Python# python read_and_publish.py
Traceback (most recent call last):
File “read_and_publish.py”, line 22, in
myMQTTClient.connect()
File “/usr/local/lib/python2.7/dist-packages/AWSIoTPythonSDK/MQTTLib.py”, line 481, in connect
return self._mqtt_core.connect(keepAliveIntervalSecond)
File “/usr/local/lib/python2.7/dist-packages/AWSIoTPythonSDK/core/protocol/mqtt_core.py”, line 183, in connect
self.connect_async(keep_alive_sec, self._create_blocking_ack_callback(event))
File “/usr/local/lib/python2.7/dist-packages/AWSIoTPythonSDK/core/protocol/mqtt_core.py”, line 196, in connect_async
rc = self._internal_async_client.connect(keep_alive_sec, ack_callback)
File “/usr/local/lib/python2.7/dist-packages/AWSIoTPythonSDK/core/protocol/internal/clients.py”, line 116, in connect
rc = self._paho_client.connect(host, port, keep_alive_sec)
File “/usr/local/lib/python2.7/dist-packages/AWSIoTPythonSDK/core/protocol/paho/client.py”, line 654, in connect
return self.reconnect()
File “/usr/local/lib/python2.7/dist-packages/AWSIoTPythonSDK/core/protocol/paho/client.py”, line 776, in reconnect
sock = socket.create_connection((self._host, self._port), source_address=(self._bind_address, 0))
File “/usr/lib/python2.7/socket.py”, line 553, in create_connection
for res in getaddrinfo(host, port, 0, SOCK_STREAM):
socket.gaierror: [Errno -2] Name or service not known
root@raspberrypi:/home/pi/aws-iot-device-sdk-python/DHT11_Python#
Hello, using DHT22 is not an issue, however you’ll need to change the code a little and use the DHT22 library (e.g. https://github.com/adafruit/Adafruit_Python_DHT). The error you are getting is unrelated to the DHT, are you sure that line 14 and 15 has been updated to reflect your AWS environment?
Hi Calvin,
great tutorial. however i am getting a timeout
No handlers could be found for logger “AWSIoTPythonSDK.core.protocol.mqtt_core”
Traceback (most recent call last):
File “/home/pi/DHT11_Python/read_and_publish.py”, line 22, in
myMQTTClient.connect()
File “/usr/local/lib/python2.7/dist-packages/AWSIoTPythonSDK/MQTTLib.py”, line 481, in connect
return self._mqtt_core.connect(keepAliveIntervalSecond)
File “/usr/local/lib/python2.7/dist-packages/AWSIoTPythonSDK/core/protocol/mqtt_core.py”, line 186, in connect
raise connectTimeoutException()
connectTimeoutException
>>>
any thought?
roni
Hello, “connectTimeoutException” means the MQTT server’s not reachable, which likely mean your configuration is wrong. check your line 14 and 15 again.
Hi Calvin: Now your Pi upload frequency is 5 seconds right?Meaning 5 seconds later detect temperature again If I want to change to 30 seconds, 1 minutes…. Which line I should change? Thanks
Hello. line 35, sleep(4), right now it sleeps for 4 second before waking up and repeat the loop again.
I’m getting following error. Can you please help to solve this error?
Traceback (most recent call last):
File “/home/pi/aws-iot-device-sdk-python/AWS_IoT_Trial.py”, line 22, in
myMQTTClient.connect()
File “/home/pi/aws-iot-device-sdk-python/AWSIoTPythonSDK/MQTTLib.py”, line 481, in connect
return self._mqtt_core.connect(keepAliveIntervalSecond)
File “/home/pi/aws-iot-device-sdk-python/AWSIoTPythonSDK/core/protocol/mqtt_core.py”, line 183, in connect
self.connect_async(keep_alive_sec, self._create_blocking_ack_callback(event))
File “/home/pi/aws-iot-device-sdk-python/AWSIoTPythonSDK/core/protocol/mqtt_core.py”, line 196, in connect_async
rc = self._internal_async_client.connect(keep_alive_sec, ack_callback)
File “/home/pi/aws-iot-device-sdk-python/AWSIoTPythonSDK/core/protocol/internal/clients.py”, line 116, in connect
rc = self._paho_client.connect(host, port, keep_alive_sec)
File “/home/pi/aws-iot-device-sdk-python/AWSIoTPythonSDK/core/protocol/paho/client.py”, line 654, in connect
return self.reconnect()
File “/home/pi/aws-iot-device-sdk-python/AWSIoTPythonSDK/core/protocol/paho/client.py”, line 776, in reconnect
sock = socket.create_connection((self._host, self._port), source_address=(self._bind_address, 0))
File “/usr/lib/python3.5/socket.py”, line 694, in create_connection
for res in getaddrinfo(host, port, 0, SOCK_STREAM):
File “/usr/lib/python3.5/socket.py”, line 733, in getaddrinfo
for res in _socket.getaddrinfo(host, port, family, type, proto, flags):
socket.gaierror: [Errno -2] Name or service not known
Hello Ponraj, most likely your configuration is wrong. check your line 14 and 15 again.
myMQTTClient.connect()
File “/usr/local/lib/python2.7/dist-packages/AWSIoTPythonSDK/MQTTLib.py”, line 481, in connect
return self._mqtt_core.connect(keepAliveIntervalSecond)
File “/usr/local/lib/python2.7/dist-packages/AWSIoTPythonSDK/core/protocol/mqtt_core.py”, line 183, in connect
self.connect_async(keep_alive_sec, self._create_blocking_ack_callback(event))
File “/usr/local/lib/python2.7/dist-packages/AWSIoTPythonSDK/core/protocol/mqtt_core.py”, line 196, in connect_async
rc = self._internal_async_client.connect(keep_alive_sec, ack_callback)
File “/usr/local/lib/python2.7/dist-packages/AWSIoTPythonSDK/core/protocol/internal/clients.py”, line 116, in connect
rc = self._paho_client.connect(host, port, keep_alive_sec)
File “/usr/local/lib/python2.7/dist-packages/AWSIoTPythonSDK/core/protocol/paho/client.py”, line 654, in connect
return self.reconnect()
File “/usr/local/lib/python2.7/dist-packages/AWSIoTPythonSDK/core/protocol/paho/client.py”, line 797, in reconnect
ciphers=self._tls_ciphers)
File “/usr/lib/python2.7/ssl.py”, line 943, in wrap_socket
ciphers=ciphers)
File “/usr/lib/python2.7/ssl.py”, line 552, in __init__
self._context.load_verify_locations(ca_certs)
ssl.SSLError: unknown error (_ssl.c:2947)
Hello Venkata, most likely your configuration is wrong. check your line 14 and 15 again.
Hi Calvin,
Thanks for this great tutorial. I am relatively new on AWS. I worked as you said and was able to upload data points on AWS, however, I am having an issue with Elastic search. I am facing difficulty in setting up the rule I can not figure out, how to access that option.
Hi Calvin,
Thank you for your contents.
After I make a “read_and_publish.py” file, then I run it, but I got an error like the below.
File “read_and_publish.py”, line 1
thonSDK.MQTTLib import AWSIoTMQTTClient
^
SyntaxError: invalid syntax
I think I installed related files successfully, but it does not work.
How to install those libraries mannually?
Thank you!
Hi Jay, if you read the error message, it’s apparent that the first few lines (and beginning few characters of the line) of the code is missing.
hi calvin,
i am getting this error:
Traceback (most recent call last):
File “aws.py”, line 28, in
myMQTTClient.connect()
File “/usr/local/lib/python2.7/dist-packages/AWSIoTPythonSDK/MQTTLib.py”, line 485, in connect
return self._mqtt_core.connect(keepAliveIntervalSecond)
File “/usr/local/lib/python2.7/dist-packages/AWSIoTPythonSDK/core/protocol/mqtt_core.py”, line 192, in connect
self.connect_async(keep_alive_sec, self._create_blocking_ack_callback(event))
File “/usr/local/lib/python2.7/dist-packages/AWSIoTPythonSDK/core/protocol/mqtt_core.py”, line 219, in connect_async
raise e
ssl.SSLError: unknown error (_ssl.c:2947)
Hi, please check your certificates.
hi great blog !
i got this error please help me
myMQTTClient.connect()
File “/home/pi/.local/lib/python2.7/site-packages/AWSIoTPythonSDK/MQTTLib.py”, line 485, in connect
return self._mqtt_core.connect(keepAliveIntervalSecond)
File “/home/pi/.local/lib/python2.7/site-packages/AWSIoTPythonSDK/core/protocol/mqtt_core.py”, line 192, in connect
self.connect_async(keep_alive_sec, self._create_blocking_ack_callback(event))
File “/home/pi/.local/lib/python2.7/site-packages/AWSIoTPythonSDK/core/protocol/mqtt_core.py”, line 219, in connect_async
raise e
ssl.SSLError: [SSL: CERTIFICATE_VERIFY_FAILED] certificate verify failed (_ssl.c:661)
no problem i got it thnaks a lot 🙂
Hi All, i got this error please help me
Traceback (most recent call last):
File “app.py”, line 63, in
client.connect()
File “/usr/local/lib/python2.7/site-packages/AWSIoTPythonSDK/MQTTLib.py”, line 403, in connect
return self._mqttCore.connect(keepAliveIntervalSecond)
File “/usr/local/lib/python2.7/site-packages/AWSIoTPythonSDK/core/protocol/mqttCore.py”, line 290, in connect
self._pahoClient.connect(self._host, self._port, keepAliveInterval) # Throw exception…
File “/usr/local/lib/python2.7/site-packages/AWSIoTPythonSDK/core/protocol/paho/client.py”, line 655, in connect
return self.reconnect()
File “/usr/local/lib/python2.7/site-packages/AWSIoTPythonSDK/core/protocol/paho/client.py”, line 798, in reconnect
ciphers=self._tls_ciphers)
File “/usr/lib64/python2.7/ssl.py”, line 943, in wrap_socket
ciphers=ciphers)
File “/usr/lib64/python2.7/ssl.py”, line 611, in __init__
self.do_handshake()
File “/usr/lib64/python2.7/ssl.py”, line 840, in do_handshake
self._sslobj.do_handshake()
ssl.SSLError: [SSL: CERTIFICATE_VERIFY_FAILED] certificate verify failed (_ssl.c:700)
I guess the endpoint address you input is not correct. Take .iot instead of -ats.iot
Hi Calvin,
I am getting the following error:
self.connect_async(keep_alive_sec, self._create_blocking_ack_callback(event))
File “/usr/local/lib/python3.5/dist-packages/AWSIoTPythonSDK/core/protocol/mqtt_core.py”, line 219, in connect_async
raise e
File “/usr/local/lib/python3.5/dist-packages/AWSIoTPythonSDK/core/protocol/mqtt_core.py”, line 207, in connect_async
rc = self._internal_async_client.connect(keep_alive_sec, ack_callback)
File “/usr/local/lib/python3.5/dist-packages/AWSIoTPythonSDK/core/protocol/internal/clients.py”, line 119, in connect
rc = self._paho_client.connect(host, port, keep_alive_sec)
File “/usr/local/lib/python3.5/dist-packages/AWSIoTPythonSDK/core/protocol/paho/client.py”, line 664, in connect
return self.reconnect()
File “/usr/local/lib/python3.5/dist-packages/AWSIoTPythonSDK/core/protocol/paho/client.py”, line 824, in reconnect
ciphers=self._tls_ciphers)
File “/usr/lib/python3.5/ssl.py”, line 1077, in wrap_socket
ciphers=ciphers)
File “/usr/lib/python3.5/ssl.py”, line 699, in __init__
self._context.load_cert_chain(certfile, keyfile)
ssl.SSLError: [SSL] PEM lib (_ssl.c:2943)
I have verified that the path the for your example is correct ‘(“/home/pi/cert/CA.pem”, “/home/pi/cert/xxxx-private.pem.key”, “/home/pi/cert/xxxxx-certificate.pem.crt”)’
I have tried-
recreating IoT thing with new ca, key and cert and amending code to reflect their path.
Raspbian GNU/Linux 9 (stretch)
Python 3.5.3
Helped me out a lot thanks a million.